React Query Firebaseを使って React Nativeで Firebase Authを通して認証したりFirebase Functionsの関数を 呼び出してみよう
React Query Firebaseとは、Firebaseを使いやすくするためのHookのセットを提供してくれるパッケージです。提供されているHookでは、React Queryをラップしていて、React Queryの利点を融合することでフックをプロジェクトに対して簡単に導入できるようにしている。
TL;DR
今回作成したプロジェクトはこちらのリポジトリから見ることができる。
React Nativeプロジェクトの準備
React Nativeプロジェクトの作成方法やReact Queryの導入方法や簡単な使い方に関してはこちらの記事を参照してほしい。
Firebaseプロジェクトの準備
Firebaseプロジェクトの初期化方法などはこちらの記事を参照してほしい。
インストール
firebaseが導入されていることを確認する。導入されていない場合はインストールしておく。今回は最新バージョンの9を使用する。
yarn add firebase
React Query FirebaseではFirebaseで使いたい機能に合わせて、それらの機能に関するHookを提供するパッケージを個別にインストールする。
今回は@react-query-firebase/authと@react-query-firebase/functionsをインストールする。
yarn add @react-query-firebase/auth @react-query-firebase/functions
@tanstack/react-queryとreact-query問題
@tanstack/react-queryのQueryClientProviderを使用してReact Query FirebaseのuseAuthUserなどを使用すると、No QueryClient set, use QueryClientProvider to set oneというエラーが発生してしまうので、必ずreact-queryのQueryClientProviderを使用するようにする。
そして、必ず@4.0.0以上ではなく@3.39.2をインストールするようにする。これはreact-queryの型問題を解決するためである。@4.0.0以上だと型ファイルが見つからないので個別に型ファイルをインストールしようとするが、それでも型ファイルが見つからないとエラーが発生する。@types/react-queryのバージョンを下げると、今度はQueryClientProviderに赤線が表示されてしまう。これらの問題を解決するためにバージョン3の最後のバージョンである@3.39.2を指定する。
yarn add react-query@3.39.2
firebase.tsを作成する。
Firebaseのインスタンスを作成して、authやfunctionsのインスタンスをエクスポートするfirebase.tsファイルを作成する。
エミュレーターに接続するためには、個別にconnectAuthEmulator関数とconnectFunctionsEmulator関数を呼び出す。このとき、作成したauth変数とfunctions変数を渡す。
// helpers/firebase.ts

import "firebase/auth";
import "firebase/firestore";
import "firebase/functions";
import "firebase/storage";
import { initializeApp } from "firebase/app";
import Constants from "expo-constants";
import { connectAuthEmulator, getAuth } from "firebase/auth";
import { connectFunctionsEmulator, getFunctions } from "firebase/functions";

type Config = {
    apiKey: string | undefined;
    authDomain: string | undefined;
    databaseURL?: string | undefined;
    projectId: string | undefined;
    storageBucket: string | undefined;
    messagingSenderId: string | undefined;
    appId: string | undefined;
    measurementId: string | undefined;
};

const config: Config = {
    apiKey: Constants.manifest?.extra?.firebase.apiKey,
    authDomain: Constants.manifest?.extra?.firebase.authDomain,
    projectId: Constants.manifest?.extra?.firebase.projectId,
    storageBucket: Constants.manifest?.extra?.firebase.storageBucket,
    messagingSenderId: Constants.manifest?.extra?.firebase.messagingSenderId,
    appId: Constants.manifest?.extra?.firebase.appId,
    measurementId: Constants.manifest?.extra?.firebase.measurementId
};

const firebase = initializeApp({
    projectId: config.projectId,
    apiKey: config.apiKey,
    authDomain: config.authDomain,
    storageBucket: config.storageBucket
});

export const auth = getAuth(firebase);
connectAuthEmulator(auth, "http://localhost:9099");
export const functions = getFunctions(firebase);
connectFunctionsEmulator(functions, "localhost", 5001);
Firebaseの認証情報を取得するためにapp.config.jsを作成して、その中で環境変数からそれぞれの値を取得してConstants.manifest.extra.*で読み取れるようにconfig情報を更新して返すようにする。
// app.config.js

import dotenv from "dotenv";

dotenv.config();

export default ({ config }) => {
  const appConfig = {
    ...config,
    extra: {
      firebase: {
        apiKey: process.env.FIREBASE_API_KEY,
        authDomain: process.env.FIREBASE_AUTH_DOMAIN,
        databaseURL: process.env.FIREBASE_DATABASE_URL,
        projectId: process.env.FIREBASE_PROJECT_ID,
        storageBucket: process.env.FIREBASE_STORAGE_BUCKET,
        messagingSenderId: process.env.FIREBASE_MESSAGING_SENDER_ID,
        appId: process.env.FIREBASE_APP_ID,
        measurementId: process.env.FIREBASE_MEASUREMENT_ID,
        dynamicLinkDomain: process.env.FIREBASE_DYNAMIC_DOMAIN,
      },
    },
  };
  return appConfig;
};
ローカルで実行する場合は.envファイルを次のフォーマットで作成しておく。
# .env
FIREBASE_API_KEY=""
FIREBASE_AUTH_DOMAIN=""
FIREBASE_PROJECT_ID=""
FIREBASE_STORAGE_BUCKET=""
FIREBASE_MESSAGING_SENDER_ID=""
FIREBASE_APP_ID=""
FIREBASE_MEASUREMENT_ID=""
FIREBASE_DYNAMIC_DOMAIN=""
匿名ログインを行い、ユーザー情報を取得する
匿名ログインを行うにはuseAuthSignInAnonymouslyを使用する。第一引数にauthインスタンスを渡して、第二引数にオプションオブジェクトを渡す。
ドキュメントではmutation.mutateに何も渡さないで呼び出すようになっているが、実際に行うと型エラーが出てしまうので、emailとpasswordにから文字列を設定したオブジェクトを渡す。
import { auth } from "../helpers/firebase";
import {
  useAuthSignInAnonymously,
} from "@react-query-firebase/auth";

...

const mutation = useAuthSignInAnonymously(auth, {
  onSuccess(data, variables, context) {
    console.log("[onSuccess]: ", data);
  },
  onError(error, variables, context) {
    console.warn("[onError]: ", error);
  },
});

const handleSigninAnonymously = useCallback(() => {
  if (authQuery.isLoading || authQuery.isFetching || authQuery.data) {
    return () => {};
  }
  mutation.mutate({
    email: "",
    password: "",
  });
}, [authQuery]);

...

return (
  <Box px={3} py={3}>
    {!authQuery.data && authQuery.isFetched ? (
      <Button
        onPress={handleSigninAnonymously}
        isLoading={authQuery.isFetching || authQuery.isLoading}
      >
        {"匿名認証を行う"}
      </Button>
    ) : null}
  </Box>
)
onSuccessとonError
第二引数のオプションにonSuccessコールバック関数を渡すと、ログイン成功時に、指定した関数が呼び出される。
onErrorコールバック関数を渡した場合はログイン失敗時に、指定した関数が呼び出される。
匿名アカウントを永久アカウントに変換する
ログイン済みの匿名アカウントを、ユーザーに新しいメールアドレスとパスワードを入力してもらうことで永久アカウントに変換することができる。
これを行うにはuseAuthLinkWithCredentialを使用する。
今回は事前に準備したメールアドレスとパスワードを使用する。
mutation.mutateにはオブジェクトを渡す。userフィールドにはUser型のデータを渡す。これを取得するにはuseAuthUserを使用する。
credentialはFirebaseのEmailAuthProviderを利用して、入力されたメールアドレスとパスワードを渡して取得する。
import {
  Box,
  Button,
} from "native-base";
import { auth } from "../helpers/firebase";
import {
  useAuthUser,
  useAuthLinkWithCredential,
} from "@react-query-firebase/auth";

...

const authQuery = useAuthUser(["user"], auth);
const { mutate: linkWithCredential } = useAuthLinkWithCredential();

...

useEffect(() => {
    console.log("[authQuery.data]: ", authQuery.data);
}, [authQuery]);

const handleSigninWithEmailAndPassword = useCallback(() => {
  if (!authQuery.data) {
    return;
  }
  const email = "example@example.com";
  const password = "password";
  const credential = EmailAuthProvider.credential(email, password);
  linkWithCredential({
    user: authQuery.data,
    credential,
  });
}, [authQuery]);

...


return (
  <Box px={3} py={3}>
    {authQuery.data && authQuery.data.isAnonymous ? (
      <Button
        bg={authQuery.data?.isAnonymous ? "cyan.500" : "dark.500"}
        onPress={handleSigninWithEmailAndPassword}
        isLoading={authQuery.isFetching || authQuery.isLoading}
        disabled={!authQuery.data?.isAnonymous}
      >
        {"匿名アカウントから変更する"}
      </Button>
    ) : null}
    {authQuery.data && !authQuery.data.isAnonymous ? (
      <Text>{authQuery.data.email}</Text>
    ) : null}
  </Box>
);
...
永久アカウントへの返還に成功するとuseAuthUserから返される値が変更されるので、これを利用していろいろな機能を実装できる。
このとき、useEffectやuseCallbackの第二引数に[authQuery.data]ではなく、[authQuery]を渡すことに注意する。
Firebase Functionsを呼び出して、取得した結果を表示する
Firebase Functionsで定義した呼び出し可能関数を呼び出したい場合はuseFunctionsQueryを使用する。
第一引数にはクエリーキーを渡す。
第二引数にはFunctionsインスタンスを渡す。
第三引数には呼び出した呼び出し可能関数の名前を指定する。
第四引数には、もし呼び出し可能関数リクエストボディを必要とする場合はそれに対応するオブジェクトを渡す。
最初の型引数として、呼び出し可能関数が求めるリクエストボディの型を指定できる。これはRequestData型として定義する。
第二の型引数として呼び出し可能関数が返すレスポンスの型を指定できる。これはResponseBody型として定義する。
import {
  Text,
  Box,
  FlatList,
  VStack,
  HStack,
  Image,
  Spacer,
  Heading,
  Button,
} from "native-base";import { functions } from "../helpers/firebase";

...

type RequestData = {};
type ResponseData = {
  [key: string]: {
    id: string;
    label: string;
    date: string;
    value: number;
    method: string;
    exp: number;
    createdAt: string;
    icon: string;
  }[];
};

...

const functionsQuery = useFunctionsQuery<RequestData, ResponseData>(
  ["getActivities"],
  functions,
  "getActivities",
  {}
);

...
return (
  <FlatList
    contentContainerStyle={{
      paddingHorizontal: 12,
      paddingVertical: 12,
    }}
    h="1/2"
    showsVerticalScrollIndicator={false}
    showsHorizontalScrollIndicator={false}
    backgroundColor={"dark.800"}
    data={functionsQuery.data?.["2022-07-15"] ?? []}
    renderItem={({ item }) => {
      const { icon, date, label, value, createdAt, method, exp } = item;
      return (
        <>
          <VStack w="full" borderRadius={10} bg={"white"} px={3} py={3}>
            <HStack mb={3}>
              <Image
                source={{
                  uri: icon,
                }}
                alt="Alternate Text"
                size="sm"
                borderRadius={10}
              />
              <VStack px={3}>
                <Text fontWeight={date === "今日" ? "bold" : "normal"}>
                  {date}
                </Text>
                <Text color="dark.400">{label}</Text>
              </VStack>
            </HStack>
            <HStack>
              <VStack>
                <Text fontWeight={"bold"} fontSize={"lg"}>
                  {value}
                </Text>
                <Text color="dark.500">
                  {method === "COUNT" ? "回" : "時間"}
                </Text>
              </VStack>
              <Spacer />
              <VStack>
                <Text fontWeight={"bold"} fontSize={"lg"}>
                  {exp}
                </Text>
                <Text color="dark.500">経験値</Text>
              </VStack>
              <Spacer />
              <VStack>
                <Text fontWeight={"bold"} fontSize={"lg"}>
                  {createdAt}
                </Text>
                <Text color="dark.500">スケジュール</Text>
              </VStack>
            </HStack>
          </VStack>
          <Box mb={3} />
        </>
      );
    }}
  />
);
useFunctionsQueryとuseFunctionsCallの違い
useFunctionsQueryを使用した場合はコンポーネントのレンダリング時に指定したCallable Functionが呼び出される。
もし、任意のタイミングでオンデマンドにCallable Functionを呼び出したい場合はuseFunctionsCallを利用する。
Firebase エミュレーターを立ち上げる。
作成済みのプロジェクトをFirebase CLIで選択する。
firebase projects:list
firebase use project-name
Firebaseエミュレーターの初期化を行う。 今回はAuthenticationとFunctionsを選択する。
firebase init emulators
ルートディレクトリのfirebase.jsonにemulatorsフィールドが作成される。
// firebase.json
{
  "functions": {
    ...
  },
  "emulators": {
    "auth": {
      "port": 9099
    },
    "functions": {
      "port": 5001
    },
    "ui": {
      "enabled": true
    }
  }
}
そしてエミュレーターを起動する。
firebase emulators start
アプリを起動する
アプリを起動する。
yarn start
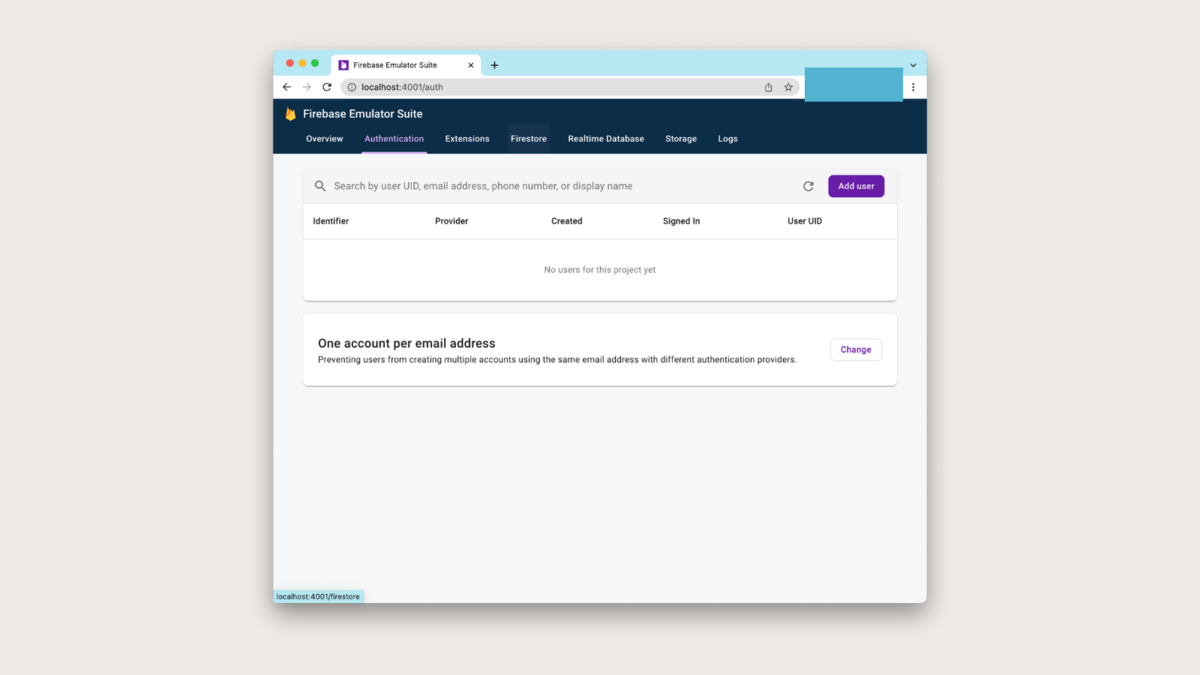
呼び出し可能関数の結果が表示されていて、匿名認証を行うと書かれたボタンが表示されている。

このときは、まだユーザーは作成されていない。
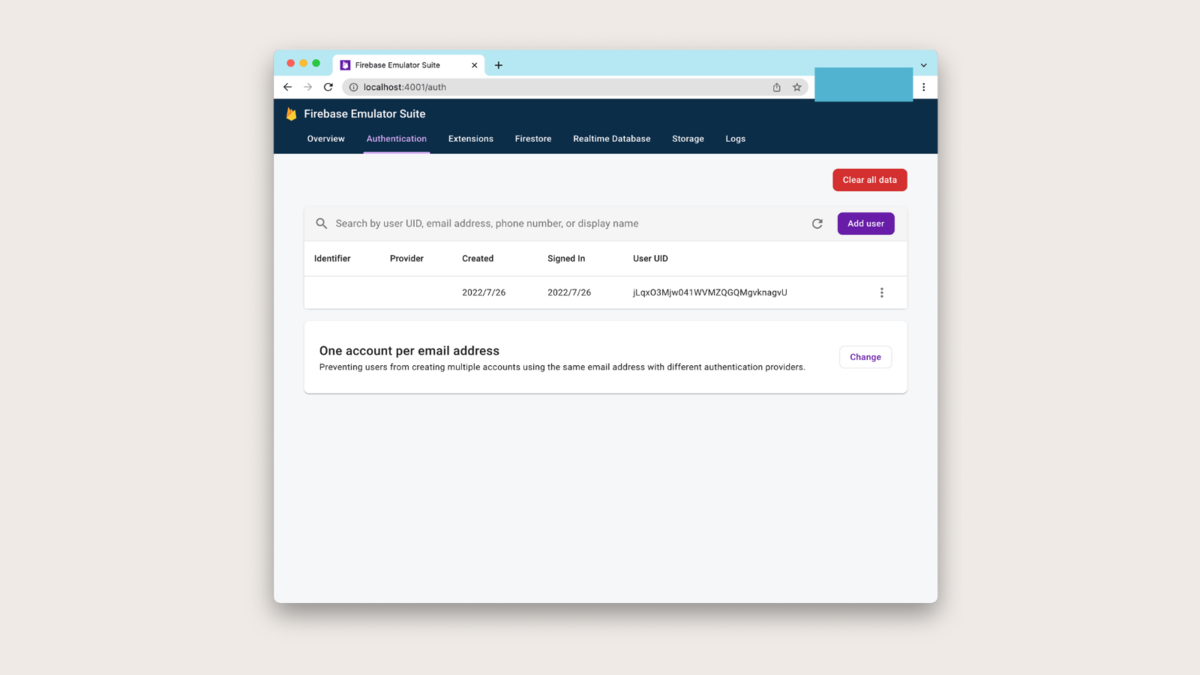
ボタンをタップして匿名認証を行う。するとボタンの内容が変更される。
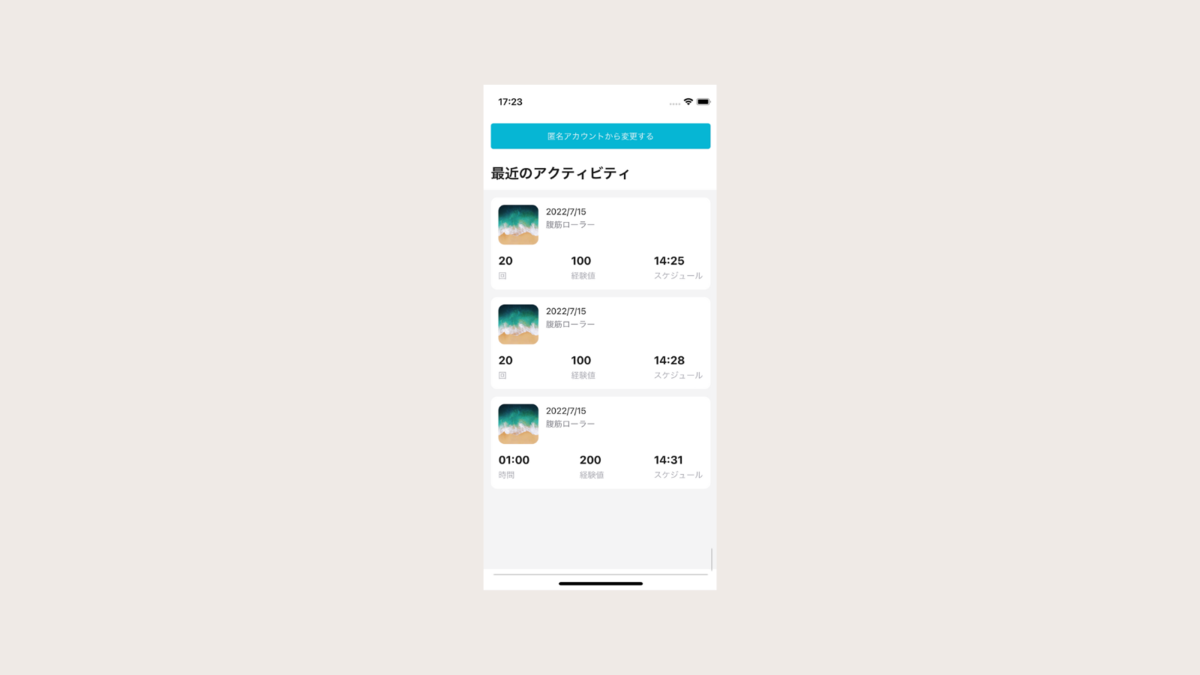
そして、匿名アカウントが作成されている。
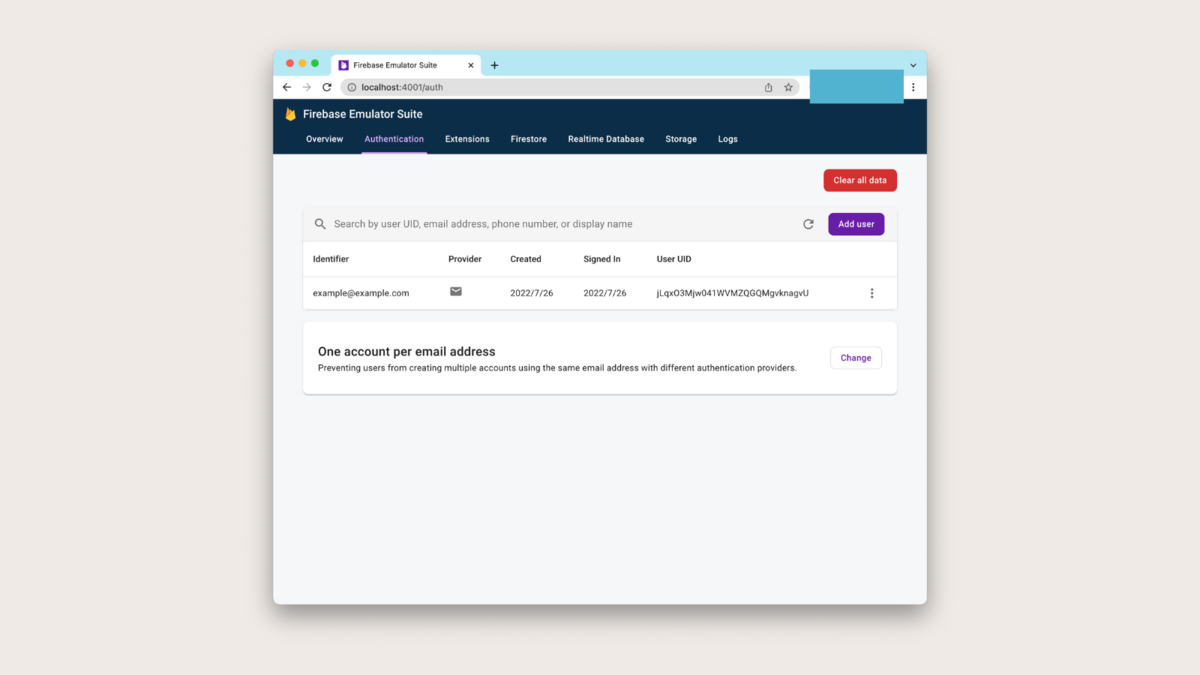
次に、匿名アカウントを永久化する。
メールアドレスが表示されれば成功。

そして、先ほどまで空欄だったIdentifierカラムにexample@example.comが設定されていて、Providerカラムにメールアイコンが表示されている。